Sunday, November 24, 2013

So it Begins- Sewing Machine Restoration

I've been dreaming of learning how to tear down and repair old sewing machines. Ever since I got Mighty Tiny, my featherweight, (who has yet to get a proper name) and learned that I have to do some basic service on her myself, I've wanted a machine that I can tear down and really see how it works. I understand the basic mechanisms of the lock stitch but the gears and parts and springs and screws were endlessly fascinating yet still a mystery to me. I also adore vintage machines over the new plastic wonders that can't be generally serviced at home.

 So, what's a girl to do? Craigslist! I found a Singer 128 in bad shape for $30 and, after asking Sweetie for an early Christmas present, made the call to the sellers. I made an appointment to go see it on a Friday night. I more or less knew it would come home, the question was how fast and how much would I pay for it. The ad said that the machine worked when the balance wheel was turned but either the motor or cords were non-functioning. No biggie, I want to turn it into a hand-crank machine anyway so I thought this would be perfect!

 A word of advice. When you ask Karma for something, in my case a beater machine to refurb, be careful. You might get exactly that. When I got to the house of the seller I was shown the machine. The needle bar did not move and there was no light attached when there should have been. Because the cords were frayed I didn't get to plug it in to check the motor. Again, not huge since I didn't want a motorized machine anyway but it would have been nice to check. So the needle bar and feed dogs don't move, yet the balance wheel does. Hmmm. Not ideal because that means a gear is not engaging somewhere. I offer $25 and it's accepted and I carry the new girl out to the car.

 I lovingly set her in the backseat and I'm driving down I-35 when someone makes a quick lane change. Mary Jane (her new name, I've decided) goes ass over tit into the floorboard. At this point the impact has happened to the case and I figure there's not much more I can do so I drive her home, haul her out of the car and proceed to whack the case with a small rubber mallet until it comes off. That's as far as I got since I had to do some day-job work. Today Sweetie took her down to the basement work table where she'll get deconstructed, cleaned, oiled and reassembled but not before I snapped some "before" pics. I'm hoping the case can go to my dad's workshop for some TLC after Christmas. So, here's Mary Jane, the newest member of the family and I'm hoping she'll be right as rain very soon.

Front

Head Plate

Motor with the cord cut off


Back

A little dark but you can clearly see the
needlebar is completely down.

Wednesday, November 20, 2013

Wedding Quilt #2

One of my best friends is getting married and I'm so happy for him! Robert has been one of those special people in my life since college and I will be forever grateful for his love and support over the years. So when I heard he'd found "the guy" to marry, I wanted to do something special for them both.

Robert and me, a long long time ago.
So I created their wedding quilt. I used a "disappearing 9-patch" pattern (D9P) in purples and black/charcoal.


I kicked this pattern around several times but in the end I'm pretty pleased with how it came out. Check below the jump for the full tutorial.

Saturday, September 7, 2013

The Wedding Quilt #1

My brother, Ryan married his fiancee wife last month in St. Joseph, Michigan. Needless to say, it was beautiful. Sweetie and I drove to Michigan the week before the wedding to have some vacation time. The little bro had rented a beach house for family so we didn't have to worry about accommodations, which was so nice!
The Beach House

We spent several days on Lake Michigan, which was just out our front door and did wine tasting, beach time and sight-seeing!

Silver Beach Lighthouse
For a wedding present, I created a quilt for the couple.
3 stripe rail fence quilt
A better view of the pattern

Using a "rail fence" pattern, i strip pieced 3 1/2" strips of white on black, eggplant purple and black on white. I cut 9 1/2" squares and set them in a zig-zag pattern down the quilt. I had 4 different black on whites so each zig-zag is one print. I added 5" borders in the purple.

I had 1/2 yard cuts of each white print. One print comprises each zig-zag.
The label was also a bit of a challenge. I originally wanted it embroidered but I don't have an embroidery machine and was quickly running out of time. I found an idea where you printed on fabric so I created a design and had sweetie print it on a piece of background fabric. The ink wasn't very dark so sweetie went over the printing with a fine tip fabric marker. Fortunately, my quilter ran out of bobbin thread with 6" in the corner left to quilt, giving me the perfect place for the label. I bordered the label in a bit of left over purple and sewed it into the corner of the quilt, then I bound the quilt using the black fabric in the fence rails.


I'm happy to say that my brother and new sister-in-law really liked their quilt and now it's getting good use in their new home. That's what makes it all worthwhile.

I have several weddings coming up so there will be more! Stay tuned!

Wednesday, May 22, 2013

Tragic (but tasty) Snickerdoodles

Snickerdoodle fail
First try in the back, second in front
I am a serious stickler when it comes to fats and oils. No, I don't substitute applesauce for all fats and I don't think that all butter has to come from cows who were hugged daily but I. Hate. Shortening. I grew up on the stuff and now that I know what's in it and how it's made, (lots of refining and crappy for you trans-fat) I avoid it like the plague. I use butter, lard and other oils instead of shortening as much as possible (which is not terribly often).

So here comes the problem. A co-worker asked if I'd make snickerdoodles for the monthly staff meeting. "This shouldn't be too hard," I thought. Wrong!

I went to the internet, found a recipe with a ton of reviews and read the reviews. The recipe used shortening. So I altered the recipe to sub butter for the shortening. It was glorious. The dough was creamy but stiff after I took it out of the fridge and rolled into little cookie balls nicely. I rolled the balls in cinnamon and sugar and flattened them down, per the most popular reviewer's method.

And disaster struck. These babies spread like warm jello. I suddenly didn't have snickerdoodle cookies, I had a very thin sheet of snickerdoodles all over my silpat. I had two trays to make so on the second tray I placed less cookies farther apart, thinking if they spread they wouldn't touch. I also didn't flatten them. I froze the dough so it would take longer to spread and I baked at 300 instead of 400, watching very very closely. Guess what? They spread again, just not running into each other this time. Sigh.

Sweetie liked the first batch of mess-ups better, saying they were more doughy. These are going to the staff meeting tomorrow night even though they're not lookers. They don't taste bad but they don't look like the pretty picture either. Any ideas for how to make them right without using shortening?

Friday, February 8, 2013

New Year, New Hobby, New Toys

2013 brings a lot of newness at our house. I got a new job (whohoo!) in a fabric store. I took up jogging with our dog Max. You can see pictures from those runs here. That's all good and well but the fun news this year, so far, has been the new antique sewing machine I picked up right before Christmas. I realize this means I bought her before 2013 but I had to have her serviced and didn't get it back until after the first of the year. I love her.


She is a post-WWII dressmaker that sweetheart found in a thrift store for $15! Sweetie called me over to meet her and at first I wasn't very impressed. An old machine that was a brand I'd never heard of didn't sound very appealing. Then I started riffling through the cabinet drawers and found the accessories box with 8 feet in it, including a darning foot, 2 rolled hem feet, a binding foot, several zipper feet and others! The bonus was the original manual since I had no clue how I was supposed to work the machine. Needless to say, we loaded it up and took it home and I had high hopes. Then I came to find out that she was so gummy with 60 years worth of oil that she'd need some major attention by someone with expertise. From there I found Mike at Antique Sewing Machines who got her retooled and purring like a kitten. I need to name her and I'm thinking Midge. I'm also thinking of having her powder-coated orange to contrast off the green walls of the sewing room, just for kicks. Did I mention she has 17 different stitches? I'm swooning now just thinking about it.

So I got a new machine and I'm in love. Also, I started a job in a fabric store. What's a girl to do? Why learn to quilt! I've never been especially great at sewing garments but I figured I could sew straight lines. There was more to it than I realized so I did what any novice would do. I asked the internet, made a pinterest board and joined a forum. The forum does a block of the month, which I thought could be a great way to start and ask questions all at the same time. So far, I've done two blocks, January and February. I'm hoping to do a rainbow color scheme and put it all together for the first of next year. Here are the blocks I've done so far.
January- Whirling Star 2
This one was interesting because it involved "Y" seams for the triangles and I spent some time with the seam ripper but it came out okay, I think.

I'm calling this "Blue Valentine"
This was my first paper pieced block and I had a heck of a time but it's done and I like the effect. It also gave me a chance to try out all Midge's decorative stitches. Did I mention I love her? What are you doing that's new in 2013?

Monday, December 31, 2012

Christmas Sewing Projects!

This year Sweetheart and I decided that we were going to try to shop small business or local business for Christmas. Part of this included our Christmas sewing where we tried to buy fabrics from local sellers too. Once we broke down and ended up at JoAnn's and once at Hancock but overall we did pretty well.
This was the year of the tablet/e-reader cases for me and we made costumes for the niece and nephew. Suffice to say this is mostly a photo brag post with links to the other bright folks I used for inspiration. Without further ado:


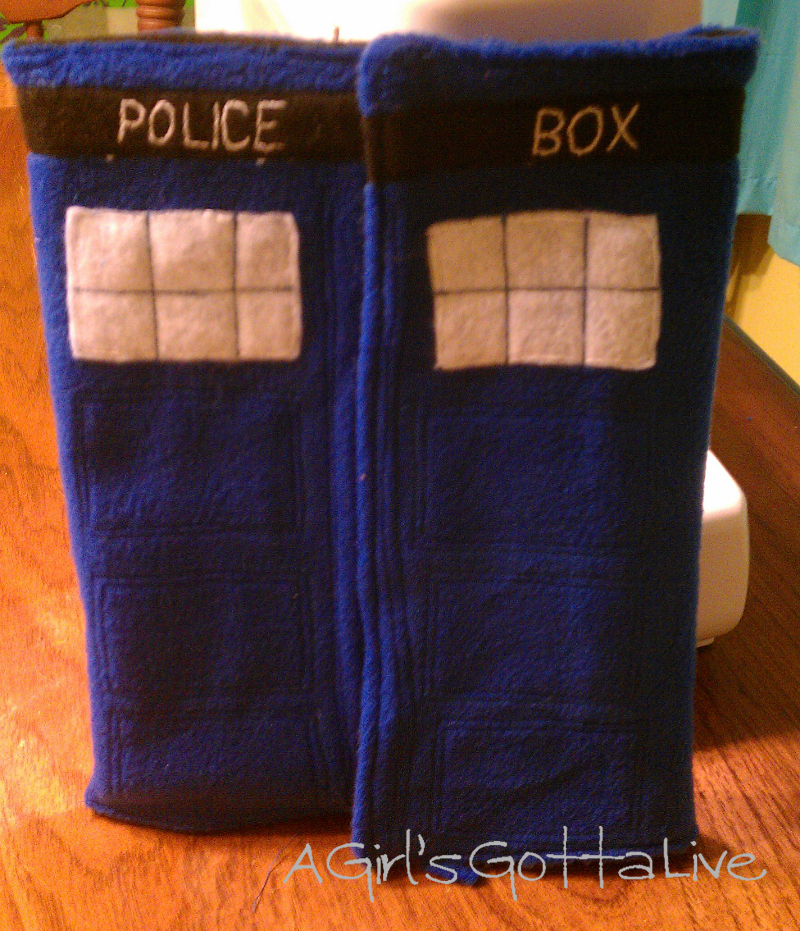
The first gift was a TARDIS iPad case for a gift exchange. The iPad case went to Alaska where it is much loved.  This case is envelope style with blue fleece and a black felt lining and felt accent pieces. I hand embroidered the "Police Box" strip and around the white windows. Velcro tape keeps it closed. I didn't have a pattern to use for this one, just the dimensions of an iPad and a bit of math. Honestly, without a walking foot, I don't know that I'd ever do this in fleece again. It was very bulky for my regular machine. I've found some better tutorials (like this one from "Dog Under My Desk") that I would scale up in cotton with interfacing instead. I tested the fit on my friends iPad. The fleece came from Addadi's fabrics in Overland Park, everything else came from my stash.


This kindle fire case belongs to my younger brother's girlfriend. My brother told me that his girlfriend loved her Kindle fire so I made her a case and stuffed it with a gift card. My main tutorial was from Clover and Violet with the corner directions to hold the kindle in coming from I'm Feelin' Crafty. This was a challenge because I slipped plastic canvas in the two sides and not the "spine" portion. As I was binding, my machine would hit the plastic canvas and curse at me by skipping stitches. I also never got a clear picture of how to do the closure around the binding so I created a button hole in the binding and threaded my closure loop through the button hole. The green inner fabric came from Fabric Recycles, the rest came from my stash.


Max got a new Christmas collar, mostly because I had the pieces and was procrastinating doing other things. The lining is a soft gold color to complement the gold threads in the collar. Fabric and collar "D" ring came from Fabric Recycles, buckle and parachute buckle came from Hancock Fabrics.


My brothers got my mom a kindle for Christmas this year so I made her a cover. I used the same process and methods as I did for my brother's girlfriend but I used a bit of fabric from my stash and, after playing on a scrap for a long time, had my first adventure in free motion quilting. I broke two needles before getting a larger one and read lots of blog posts on the subject. This was a thicker fabric and had a layer of batting between the two cover fabrics so it was sturdy enough to not need stiffeners. Free motion quilting was an interesting experience but I'm glad I tried it. Mom really liked the cover so that's all that matters! Fabric and notions were from my stash.


For our niece, Sweetheart and I decided she would like an apron and chef's hat.  I created this apron with an oilcloth body and seersucker bias binding, both of which I got at (guess where?) Fabric Recycles. The seersucker was a pain in the rear to work with but so worth it for the overall look. The dimensions for the apron came from SupaFine and I just deducted the seam allowances since I didn't line the apron. I used the bias tape to finish all the raw edges.  I also added elastic to the neck strap thanks to a great idea at Sew Liberated. Sweetheart made the chef's hat, which you can see here.

Sweetheart made a tool belt and cape for our nephew too! You can find her sewing adventures on her blog. That's it! After several late nights and plenty of time with a seam ripper, I'm not sewing any more this year! Good thing it's almost next year, right?

Saturday, December 8, 2012

Hot Chocolate Marshmallows

I bet you've seen the posts about marshmallows. Homemade marshmallows are very "in" right now and it seems that the recipes are everywhere. There are marshmallows with fillings, exotic flavors and other adornments but these marshmallows were made for hot chocolate.
Several years ago, at my first job after college, a co-worker (Hi Linda!) brought these in and I loved  them so much I begged her for the recipe. They melted so smoothly and left a nice hefty layer of marshmallow on top of my cup that I couldn't resist them. Every year when the weather gets cold I make them. Hot chocolate just doesn't seem right with any others.

The reason these melt so well is because they're just close enough to marshmallow fluff that the slightest bit of heat will melt them down. That means these are horrible for roasting but wonderful for melting in liquids.

First things first, if you don't know your candy stages (soft ball, hard ball, soft crack, etc.) get yourself a candy thermometer and calibrate it. Need to know how (and why) to calibrate your thermometer? Here's the information. Also, I use my stand mixer for this because it's easier for me. If you don't have a stand mixer you can use a hand mixer with no problems. If you don't have a hand mixer, borrow one. I don't suggest trying to stir and whisk this all by hand.

Then we begin making the worlds best hot chocolate marshmallows.This recipe can easily be multiplied depending on how many marshmallows you want and how thick you want them. The thicker they are the longer they will take to dry though. I have also used other flavorings like peppermint and almond for different effects.

Hot Chocolate Marshmallows
Printable Recipe

You will need:
  • 2 packets unflavored gelatin (1/8 c.)
  • 1 cup granulated sugar
  • 1/4 cup light corn syrup
  • 1/4 c. hot water
  • 1/4 c. cold water
  • 1 large egg white at room temperature
  • 1 scant pinch cream of tarter
  • 1 scant pinch of salt 
  • 1 tsp vanilla
  • 1/2 TBL corn starch
  • Flavorless vegetable oil for oiling pan
  • Confectioner’s sugar

Coat a small cookie sheet pan or 8x8 pan with a thin layer of oil and a
hefty bit of powdered sugar
Add your gelatin and cold water in a large bowl. Let sit for 10 minutes then
break up the mass into smaller pieces.
Combine the corn syrup, hot water and sugar in a saucepan.
Boil, undisturbed, until candy reaches 240 degrees F.
While your candy is boiling, beat your egg white,
cream of tartar and pinch of salt until stiff peaks form. Set aside.
When the syrup hits 240 degrees, pour it into the
bowl with the gelatin and beat until the mixture
 becomes white and fluffy.
Add your egg white and beat until the mixture gets glossy
and almost stringy.
Pour the marshmallow mixture into your prepared pan.
Dust with powdered sugar and let dry for at least 1-2 hours.
Cut using a pizza cutter or your favorite cookie cutters.
Dredge the pieces in powdered sugar and store airtight.

Tuesday, October 2, 2012

Entry Table from a Stereo Cabinet

Holy cow! It's been a month and projects are getting finished. We've recently created a cabinet for the cat litter box (which you can see here), Sweetheart made patio chairs out of cedar fence lumber and I created an entry table of sorts. We needed something after we rearranged the living room and this old stereo cabinet from the basement fit the bill nicely. I was going to use it originally for a litter box cabinet but that didn't pan out.


The deconstruction kept me well acquainted with a my Phillips screwdriver (holy cow it had a lot of screws!) to get all the extra parts out including the front panel and I added thin plywood for a new bottom and behind the tiled center piece. Otherwise I just shined it up, slapped on some stain where the wood was exposed and off we went! This works well to catch stuff, hold our board games and keep Max's toys up off the floor, plus sweetheart likes the retro.

Thursday, August 9, 2012

Festival Food at Home- Kettle Corn!

If you're like me, you love festival and fair food. It's only available in the summer time and you find yourself craving it every year when June rolls around.

I grew up in the city that hosts the Missouri State Fair and I have a confession, I don't love that fair. Every year the fair would come to town with it's hoard of state troopers, tourists who didn't know which lane of traffic went where and nary an available restaurant seat to be had. Residents stocked up on supplies like a blizzard was coming or went to the lake for an extended vacation.

I also worked the fair as a teenager on those parking lot trams that, for 50 cents a person, would take you to the front gate. I did this for two years until I was old enough to get my first real job in fast food.

Newer fairs and festivals are quite different for me and now I look forward to street vendors selling deep-fried confections, sandwiches in foil wrappers and corn on the cob with any number of toppings. I love to wander through craft tents touching and smelling and shaking my head at demonstrators hawking products I don't need. I like the fairs and I want the food year round. Imagine my surprise when I learned, quite by accident, how to make kettle corn quickly and on the very very cheap.

The key to good kettle corn is an oil popper with a stir stick. You can do this with a pot and spoon but be very careful since the sugar gets super hot. The rest is very simple. I've given the measurements in parts, with my measurements in parenthesis, so you can scale up or down to your tastes. Don't skimp on the oil, it helps keep the sugar from burning.

Wednesday, July 18, 2012

Box Cutter Bias Tape Blues

I love pinterest, not only because it shows me things I hadn't thought of, but because it often presents me with a new way of doing the things I've always done.

Case in point-bias tape. I hadn't used bias tape much but when I did I used the store bought boring kind.

Enter pinterest and all the nifty ways to make pretty bias tape out of your favorite fabrics and put a good use to some scraps. I had some blue paisley I wanted to use but I don't have a handy dandy bias tape maker so I found a tutorial that used a box knife without the blade to fold the fabric.

There are several tutorials on making bias tape for how to cut the strips and sew them together so I'm not going to give you the easy bits.  This is to show you the how the box cutter method works so hopefully you don't have to have the same frustrations I did and can have awesome custom bias tape!

Monday, July 2, 2012

A very full update...

So it's been awhile. I know, I know, bad blogger! The end of May and all of June were pretty busy in the ranch so here's an update.

Chicago for vacation was awesome! We stayed with my little brother, acted like tourists and had a generally fantastic relaxing vaca. I could definitely see living there if the need arose. I also loved public transportation and not having to drive everywhere and search for parking. Max even got a souvenir.

June included Shakespeare in the Park with a great group of friends, wine, fruit, cheese and crackers.
Shakes in the Park, "Midsummer's Night's Dream"

Later in the month we did Pippi Longstocking with the niece and nephew at Union Station. The kids had a great time. Our niece loved the show and our nephew loved the backstage tour. Afterward we got to play with robotics at Maker Faire in the main hall.

Last week was a blur and included a Royals game on Tuesday Night. Our tickets were pretty high up but you can't argue with free. Plus we had a great view of the entire stadium and the Royals won!
1st Inning View

We had dinner guests on Thursday and Friday nights. Thursday night I did awesome crockpot ribs I found on Pinterest, pasta salad and corn on the cob with friends bringing oreo fluff for desert. 
Friday night included steaks, scalloped potatoes, broccolli, wine, wine, key lime pie, appetizers and DQ ice cream cake. Did I mention wine? Then it was off to the bar for a bit with one of the friends for a drag show.

Saturday we went to Sweetheart's sister's wedding near St. Joseph. It was very nice but we were exhausted. Sweetheart did the music and I wrangled the nieces and nephews to some degree. I also took some time out to use a gift certificate I'd won at a silent auction to grab some new sewing machine toys at a shop in St. Joe.
Open foot, zipper foot, leather needles,
quilting ruler and fat quarter of fabric for Max.
Now it's time to take this girl to bed. Never fear, I have new projects in the works! I know you want them but be patient. Something awesome is coming soon. What fabulous projects are you working on?


Saturday, May 19, 2012

Little Make-Up bag

Yes, I'm posting this in the middle of the night. Tonight I decided I'd sew something off Pinterest instead of actually getting ready for our trip next week to Chicago. Procrastination should be my middle name this weekend. I decided on the "No Guts Boxie Pouch", which was a free pattern on Craftsy. (You do have to have or get a Craftsy account to download this pattern.)
Sweetheart was at the bar working her weekend gig and I usually do some sort of project on Friday nights. Tonight was no exception. I'd love to tell you I whipped this out in an hour or so but alas, I logged some serious time with the seam ripper. All the mistakes were my own but still had to be fixed. So, without further ado...my new make-up bag!
No Guts Boxy Pouch

The bag is about 7.5" deep by 4" tall and 6" wide which makes it perfect for packing toiletries for a weeks vacation. Try this bag, it's super forgiving and looks adorable. The instructions are really well done though it does take a bit of maneuvering at the end. People will think you spent a ton for it and all it really takes is a fat quarter of fabric or so for the outer shell and for the lining and a zipper. Tomorrow I have plans to make Sweetheart one out of blue and white paisley fabric to prolong the procrastination of getting ready to travel and I'm hoping my mistakes tonight will translate into faster work time tomorrow. Happy sewing!

Saturday, May 12, 2012

Parties, Projects and Plants 2- Funky, Cheap Curtain Tie-Backs

I am a cheapskate at heart, in case you haven't gleaned that little pearl of wisdom by now. I'm also always looking for ways to spruce up the ranch. We have a double window in the dining room and some basic curtains. Since the window is so wide we needed 4 panels to cover it completely without looking cheap. A few weeks ago I shortened the curtains but at that length I couldn't knot them anymore to hold them back. As I'm staring into the silverware drawer for the millionth time I spy the meat fork. Don't ask me what utensil I was actively looking for, that issue was gone in my flash of brilliance and new project idea. I decided I could bend a serving spoon and fork and use those for curtain tie backs!

Sweetheart wasn't keen on this idea until I told her I would not be using the serving pieces out of the silverware set she bought me for Christmas a few years ago. If this sounds crazy, stick with me.

Thursday, May 3, 2012

Parties, Projects and Plants 1- Game Night!

We have a great group of friends who we get together with regularly. Friday night was our turn to host game night with friends. We're a bit informal, meaning we don't actually start playing a game until at least an hour after everyone has arrived. That meant we opened the house at 6 and started playing Bananagrams around 8:30 after conversations about new books, a showing of youtube videos and general catching up.
I tried a couple of new-old recipes for game night which were a hit so I thought I'd share. I did Tomato-Basil Brushcetta with French Bread and goat cheese and Southwest Chicken Puffs (and you can too!).

Saturday, March 17, 2012

My Love/Hate Relationship with CakePops

We have a little niece who turned 10 this week! Happy Birthday to little C! Ten is a big age full of opinions, pouting, energy and ideas. It just so happens that the week before we had all been to an event and C wanted cakepops sold by a vendor. Daddy said "no" and Nana mentioned that if C wrote me a letter, maybe I would make cakepops for her birthday. So I got a letter and who could resist?
I have to admit I cringed inside. I do not like cakepops in their popular incarnation. They may be a "pop" but they're not cake, more like gooey truffle on a stick. If I wanted truffle on a stick, that's what I'd make. Since C hadn't actually had a cakepop at last weekend's event she wouldn't know what to expect so I set out to make a better cakepop, one that was actually cake. Mine contained no icing. I had some cake oops moments but all turned out well. Here's what I did.

Saturday, March 10, 2012

New Picture Background

I realized that I'm bad at taking pictures, even with sweeties beautiful camera. I'm forever clearing off something just so you won't see the clutter that surrounds my genius. I decided I needed a nice, consistent background so I decided to create one. Here's the result (disregard the fork and spoon, I'm using them for a future project).


Here's the process: