![]() |
| Robert and me, a long long time ago. |
Wednesday, November 20, 2013
Wedding Quilt #2
One of my best friends is getting married and I'm so happy for him! Robert has been one of those special people in my life since college and I will be forever grateful for his love and support over the years. So when I heard he'd found "the guy" to marry, I wanted to do something special for them both.
So I created their wedding quilt. I used a "disappearing 9-patch" pattern (D9P) in purples and black/charcoal.
Saturday, September 7, 2013
The Wedding Quilt #1
My brother, Ryan married his fiancee wife last month in St. Joseph, Michigan. Needless to say, it was beautiful. Sweetie and I drove to Michigan the week before the wedding to have some vacation time. The little bro had rented a beach house for family so we didn't have to worry about accommodations, which was so nice!
We spent several days on Lake Michigan, which was just out our front door and did wine tasting, beach time and sight-seeing!
For a wedding present, I created a quilt for the couple.
The label was also a bit of a challenge. I originally wanted it embroidered but I don't have an embroidery machine and was quickly running out of time. I found an idea where you printed on fabric so I created a design and had sweetie print it on a piece of background fabric. The ink wasn't very dark so sweetie went over the printing with a fine tip fabric marker. Fortunately, my quilter ran out of bobbin thread with 6" in the corner left to quilt, giving me the perfect place for the label. I bordered the label in a bit of left over purple and sewed it into the corner of the quilt, then I bound the quilt using the black fabric in the fence rails.
![]() |
| The Beach House |
We spent several days on Lake Michigan, which was just out our front door and did wine tasting, beach time and sight-seeing!
![]() |
| Silver Beach Lighthouse |
| 3 stripe rail fence quilt |
| A better view of the pattern |
Using a "rail fence" pattern, i strip pieced 3 1/2" strips of white on black, eggplant purple and black on white. I cut 9 1/2" squares and set them in a zig-zag pattern down the quilt. I had 4 different black on whites so each zig-zag is one print. I added 5" borders in the purple.
![]() |
| I had 1/2 yard cuts of each white print. One print comprises each zig-zag. |
Wednesday, May 22, 2013
Tragic (but tasty) Snickerdoodles
![]() |
| Snickerdoodle fail First try in the back, second in front |
So here comes the problem. A co-worker asked if I'd make snickerdoodles for the monthly staff meeting. "This shouldn't be too hard," I thought. Wrong!
I went to the internet, found a recipe with a ton of reviews and read the reviews. The recipe used shortening. So I altered the recipe to sub butter for the shortening. It was glorious. The dough was creamy but stiff after I took it out of the fridge and rolled into little cookie balls nicely. I rolled the balls in cinnamon and sugar and flattened them down, per the most popular reviewer's method.
And disaster struck. These babies spread like warm jello. I suddenly didn't have snickerdoodle cookies, I had a very thin sheet of snickerdoodles all over my silpat. I had two trays to make so on the second tray I placed less cookies farther apart, thinking if they spread they wouldn't touch. I also didn't flatten them. I froze the dough so it would take longer to spread and I baked at 300 instead of 400, watching very very closely. Guess what? They spread again, just not running into each other this time. Sigh.
Sweetie liked the first batch of mess-ups better, saying they were more doughy. These are going to the staff meeting tomorrow night even though they're not lookers. They don't taste bad but they don't look like the pretty picture either. Any ideas for how to make them right without using shortening?
Friday, February 8, 2013
New Year, New Hobby, New Toys
2013 brings a lot of newness at our house. I got a new job (whohoo!) in a fabric store. I took up jogging with our dog Max. You can see pictures from those runs here. That's all good and well but the fun news this year, so far, has been the new antique sewing machine I picked up right before Christmas. I realize this means I bought her before 2013 but I had to have her serviced and didn't get it back until after the first of the year. I love her.
So I got a new machine and I'm in love. Also, I started a job in a fabric store. What's a girl to do? Why learn to quilt! I've never been especially great at sewing garments but I figured I could sew straight lines. There was more to it than I realized so I did what any novice would do. I asked the internet, made a pinterest board and joined a forum. The forum does a block of the month, which I thought could be a great way to start and ask questions all at the same time. So far, I've done two blocks, January and February. I'm hoping to do a rainbow color scheme and put it all together for the first of next year. Here are the blocks I've done so far.
This one was interesting because it involved "Y" seams for the triangles and I spent some time with the seam ripper but it came out okay, I think.
This was my first paper pieced block and I had a heck of a time but it's done and I like the effect. It also gave me a chance to try out all Midge's decorative stitches. Did I mention I love her? What are you doing that's new in 2013?
She is a post-WWII dressmaker that sweetheart found in a thrift store for $15! Sweetie called me over to meet her and at first I wasn't very impressed. An old machine that was a brand I'd never heard of didn't sound very appealing. Then I started riffling through the cabinet drawers and found the accessories box with 8 feet in it, including a darning foot, 2 rolled hem feet, a binding foot, several zipper feet and others! The bonus was the original manual since I had no clue how I was supposed to work the machine. Needless to say, we loaded it up and took it home and I had high hopes. Then I came to find out that she was so gummy with 60 years worth of oil that she'd need some major attention by someone with expertise. From there I found Mike at Antique Sewing Machines who got her retooled and purring like a kitten. I need to name her and I'm thinking Midge. I'm also thinking of having her powder-coated orange to contrast off the green walls of the sewing room, just for kicks. Did I mention she has 17 different stitches? I'm swooning now just thinking about it.
So I got a new machine and I'm in love. Also, I started a job in a fabric store. What's a girl to do? Why learn to quilt! I've never been especially great at sewing garments but I figured I could sew straight lines. There was more to it than I realized so I did what any novice would do. I asked the internet, made a pinterest board and joined a forum. The forum does a block of the month, which I thought could be a great way to start and ask questions all at the same time. So far, I've done two blocks, January and February. I'm hoping to do a rainbow color scheme and put it all together for the first of next year. Here are the blocks I've done so far.
![]() |
| January- Whirling Star 2 |
![]() |
| I'm calling this "Blue Valentine" |
Monday, December 31, 2012
Christmas Sewing Projects!
This year Sweetheart and I decided that we were going to try to shop small business or local business for Christmas. Part of this included our Christmas sewing where we tried to buy fabrics from local sellers too. Once we broke down and ended up at JoAnn's and once at Hancock but overall we did pretty well.
This was the year of the tablet/e-reader cases for me and we made costumes for the niece and nephew. Suffice to say this is mostly a photo brag post with links to the other bright folks I used for inspiration. Without further ado:
This kindle fire case belongs to my younger brother's girlfriend. My brother told me that his girlfriend loved her Kindle fire so I made her a case and stuffed it with a gift card. My main tutorial was from Clover and Violet with the corner directions to hold the kindle in coming from I'm Feelin' Crafty. This was a challenge because I slipped plastic canvas in the two sides and not the "spine" portion. As I was binding, my machine would hit the plastic canvas and curse at me by skipping stitches. I also never got a clear picture of how to do the closure around the binding so I created a button hole in the binding and threaded my closure loop through the button hole. The green inner fabric came from Fabric Recycles, the rest came from my stash.
For our niece, Sweetheart and I decided she would like an apron and chef's hat. I created this apron with an oilcloth body and seersucker bias binding, both of which I got at (guess where?) Fabric Recycles. The seersucker was a pain in the rear to work with but so worth it for the overall look. The dimensions for the apron came from SupaFine and I just deducted the seam allowances since I didn't line the apron. I used the bias tape to finish all the raw edges. I also added elastic to the neck strap thanks to a great idea at Sew Liberated. Sweetheart made the chef's hat, which you can see here.
Sweetheart made a tool belt and cape for our nephew too! You can find her sewing adventures on her blog. That's it! After several late nights and plenty of time with a seam ripper, I'm not sewing any more this year! Good thing it's almost next year, right?
This was the year of the tablet/e-reader cases for me and we made costumes for the niece and nephew. Suffice to say this is mostly a photo brag post with links to the other bright folks I used for inspiration. Without further ado:
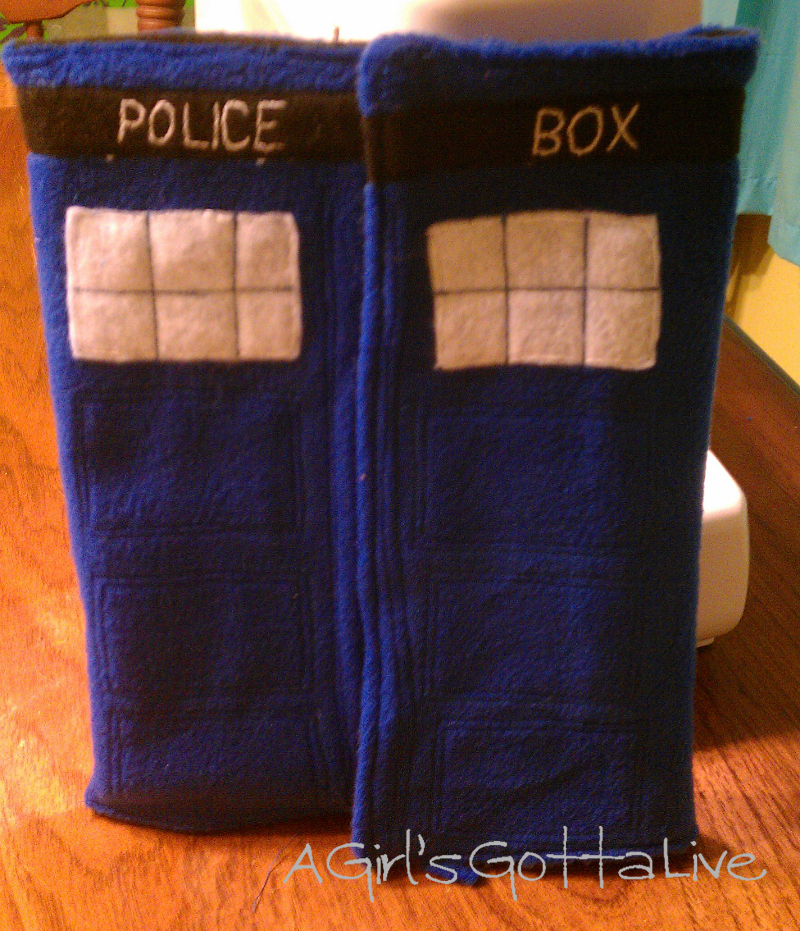
The first gift was a TARDIS iPad case for a gift exchange. The iPad case went to Alaska where it is much loved. This case is envelope style with blue fleece and a black felt lining and felt accent pieces. I hand embroidered the "Police Box" strip and around the white windows. Velcro tape keeps it closed. I didn't have a pattern to use for this one, just the dimensions of an iPad and a bit of math. Honestly, without a walking foot, I don't know that I'd ever do this in fleece again. It was very bulky for my regular machine. I've found some better tutorials (like this one from "Dog Under My Desk") that I would scale up in cotton with interfacing instead. I tested the fit on my friends iPad. The fleece came from Addadi's fabrics in Overland Park, everything else came from my stash.
This kindle fire case belongs to my younger brother's girlfriend. My brother told me that his girlfriend loved her Kindle fire so I made her a case and stuffed it with a gift card. My main tutorial was from Clover and Violet with the corner directions to hold the kindle in coming from I'm Feelin' Crafty. This was a challenge because I slipped plastic canvas in the two sides and not the "spine" portion. As I was binding, my machine would hit the plastic canvas and curse at me by skipping stitches. I also never got a clear picture of how to do the closure around the binding so I created a button hole in the binding and threaded my closure loop through the button hole. The green inner fabric came from Fabric Recycles, the rest came from my stash.
Max got a new Christmas collar, mostly because I had the pieces and was procrastinating doing other things. The lining is a soft gold color to complement the gold threads in the collar. Fabric and collar "D" ring came from Fabric Recycles, buckle and parachute buckle came from Hancock Fabrics.
My brothers got my mom a kindle for Christmas this year so I made her a cover. I used the same process and methods as I did for my brother's girlfriend but I used a bit of fabric from my stash and, after playing on a scrap for a long time, had my first adventure in free motion quilting. I broke two needles before getting a larger one and read lots of blog posts on the subject. This was a thicker fabric and had a layer of batting between the two cover fabrics so it was sturdy enough to not need stiffeners. Free motion quilting was an interesting experience but I'm glad I tried it. Mom really liked the cover so that's all that matters! Fabric and notions were from my stash.
For our niece, Sweetheart and I decided she would like an apron and chef's hat. I created this apron with an oilcloth body and seersucker bias binding, both of which I got at (guess where?) Fabric Recycles. The seersucker was a pain in the rear to work with but so worth it for the overall look. The dimensions for the apron came from SupaFine and I just deducted the seam allowances since I didn't line the apron. I used the bias tape to finish all the raw edges. I also added elastic to the neck strap thanks to a great idea at Sew Liberated. Sweetheart made the chef's hat, which you can see here.
Sweetheart made a tool belt and cape for our nephew too! You can find her sewing adventures on her blog. That's it! After several late nights and plenty of time with a seam ripper, I'm not sewing any more this year! Good thing it's almost next year, right?
Saturday, December 8, 2012
Hot Chocolate Marshmallows
Several years ago, at my first job after college, a co-worker (Hi Linda!) brought these in and I loved them so much I begged her for the recipe. They melted so smoothly and left a nice hefty layer of marshmallow on top of my cup that I couldn't resist them. Every year when the weather gets cold I make them. Hot chocolate just doesn't seem right with any others.
The reason these melt so well is because they're just close enough to marshmallow fluff that the slightest bit of heat will melt them down. That means these are horrible for roasting but wonderful for melting in liquids.
First things first, if you don't know your candy stages (soft ball, hard ball, soft crack, etc.) get yourself a candy thermometer and calibrate it. Need to know how (and why) to calibrate your thermometer? Here's the information. Also, I use my stand mixer for this because it's easier for me. If you don't have a stand mixer you can use a hand mixer with no problems. If you don't have a hand mixer, borrow one. I don't suggest trying to stir and whisk this all by hand.
Then we begin making the worlds best hot chocolate marshmallows.This recipe can easily be multiplied depending on how many marshmallows you want and how thick you want them. The thicker they are the longer they will take to dry though. I have also used other flavorings like peppermint and almond for different effects.
Hot Chocolate Marshmallows
Printable Recipe
You will need:
- 2 packets unflavored gelatin (1/8 c.)
- 1 cup granulated sugar
- 1/4 cup light corn syrup
- 1/4 c. hot water
- 1/4 c. cold water
- 1 large egg white at room temperature
- 1 scant pinch cream of tarter
- 1 scant pinch of salt
- 1 tsp vanilla
- 1/2 TBL corn starch
- Flavorless vegetable oil for oiling pan
- Confectioner’s sugar
![]() |
| Coat a small cookie sheet pan or 8x8 pan with a thin layer of oil and a hefty bit of powdered sugar |
![]() |
| Add your gelatin and cold water in a large bowl. Let sit for 10 minutes then break up the mass into smaller pieces. |
![]() |
| Combine the corn syrup, hot water and sugar in a saucepan. Boil, undisturbed, until candy reaches 240 degrees F. |
![]() |
| While your candy is boiling, beat your egg white, cream of tartar and pinch of salt until stiff peaks form. Set aside. |
![]() |
| When the syrup hits 240 degrees, pour it into the bowl with the gelatin and beat until the mixture becomes white and fluffy. |
![]() |
| Add your egg white and beat until the mixture gets glossy and almost stringy. |
Tuesday, October 2, 2012
Entry Table from a Stereo Cabinet
Holy cow! It's been a month and projects are getting finished. We've recently created a cabinet for the cat litter box (which you can see here), Sweetheart made patio chairs out of cedar fence lumber and I created an entry table of sorts. We needed something after we rearranged the living room and this old stereo cabinet from the basement fit the bill nicely. I was going to use it originally for a litter box cabinet but that didn't pan out.
The deconstruction kept me well acquainted with a my Phillips screwdriver (holy cow it had a lot of screws!) to get all the extra parts out including the front panel and I added thin plywood for a new bottom and behind the tiled center piece. Otherwise I just shined it up, slapped on some stain where the wood was exposed and off we went! This works well to catch stuff, hold our board games and keep Max's toys up off the floor, plus sweetheart likes the retro.
Subscribe to:
Posts (Atom)